Today is my birthday, and I wanted something new for myself. What I really wanted was a heavy circle skirt made out of luscious material. But I DO own a sewing machine, and I DON'T have a very large disposable income.........
So I made one.

Three things you should know about THIS seamstress.
1. I am a lazy seamstress. I don't like to sew fussy things. I don't like to measure, let alone add interfacing, binding, zippers, and the like. I CAN do those things, I just prefer not to.
2. I don't "do" patterns. Every time I do, I feel like I'm taking my physics finals all over again. I start to get the shakes, sweat all over the fabric, and sew things inside out and backwards. Without fail. Every. single. time.
3. I don't "write" patterns either. I fiddle around with something, fold it, twist it, and make something up on the spot. I'm usually lucky if I can remember what I did the next day. So, please excuse me if this tutorial sucks raw lemons. I thought this was too easy to screw up, and hopefully I'm right! :)
Materials:
6 yards (or less if you want it less "full") of whatever fabric you have lying around. I happened to have this lovely dupioni I've been hoarding for over a year.
Length of 3/4" elastic to match your waist.
OPTIONAL: ribbon trim for "waistband". Whatever length your fabric is. I highly recommend the trim, as it hides the "laziness" of your double duty casing/waistband.

There are only 3!! steps to this "Lazy women's skirt." I figure it will make more sense if I tell the story in my pitiful mousepaint pictures than if I tried to over-explain it with inadequate wording.
You COULD french seam, add a "real" waistband, increase the casing size for wider elastic, add trim to the bottom, etc. This is just a starting point. :)
***CLICK PHOTOS TO ENLARGE if you can't read them***
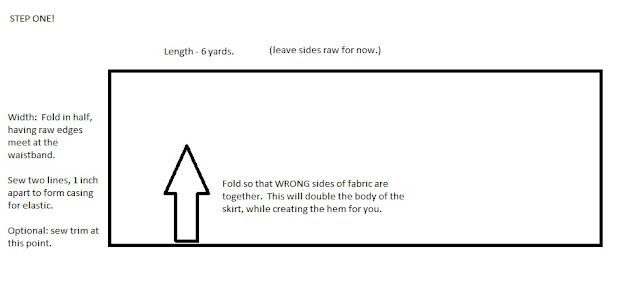


See? It's easy. It took me ten minutes. If you have questions, don't be shy! Now I just need a gold tank to go with this, and some new shoes. Man, how I wish I could just make THOSE. Imagine..... making your own shoes. I'd never leave the house.
♥Rose
So I made one.

Three things you should know about THIS seamstress.
1. I am a lazy seamstress. I don't like to sew fussy things. I don't like to measure, let alone add interfacing, binding, zippers, and the like. I CAN do those things, I just prefer not to.
2. I don't "do" patterns. Every time I do, I feel like I'm taking my physics finals all over again. I start to get the shakes, sweat all over the fabric, and sew things inside out and backwards. Without fail. Every. single. time.
3. I don't "write" patterns either. I fiddle around with something, fold it, twist it, and make something up on the spot. I'm usually lucky if I can remember what I did the next day. So, please excuse me if this tutorial sucks raw lemons. I thought this was too easy to screw up, and hopefully I'm right! :)
Materials:
6 yards (or less if you want it less "full") of whatever fabric you have lying around. I happened to have this lovely dupioni I've been hoarding for over a year.
Length of 3/4" elastic to match your waist.
OPTIONAL: ribbon trim for "waistband". Whatever length your fabric is. I highly recommend the trim, as it hides the "laziness" of your double duty casing/waistband.

There are only 3!! steps to this "Lazy women's skirt." I figure it will make more sense if I tell the story in my pitiful mousepaint pictures than if I tried to over-explain it with inadequate wording.
You COULD french seam, add a "real" waistband, increase the casing size for wider elastic, add trim to the bottom, etc. This is just a starting point. :)
***CLICK PHOTOS TO ENLARGE if you can't read them***


See? It's easy. It took me ten minutes. If you have questions, don't be shy! Now I just need a gold tank to go with this, and some new shoes. Man, how I wish I could just make THOSE. Imagine..... making your own shoes. I'd never leave the house.
♥Rose